Pin It

Frosted Flake Cookies
I have seen these cookies 50 times on Pinterest, and every time I think, Dang! I so want to make those cookies!!! So I finally decided it was time to tackle the cookies, I had an Epic fail the first time, but that happens often! So I set back to work and mastered these bad boys, and it was SO WORTH IT! they are addicting. In case I haven't mentioned, I have a cookie addiction, I probably ate most of them all by myself, out of the fridge, breakfast, lunch and dinner; it's soooo bad, but they taste so good!
Oh my gosh, I'm so excited I'm going on my second cruise since my Celiac diagnosis, very soon. We are big travelers my family and I, so this has been an adventure. I was so frustrated with the lack of anyone knowing about being GF that I got my Travel Agent license 6 months ago, so that I can help myself and other Gluten Free travelers have worry free experiences and educate the travel industry along the way! I will take pictures of the food I get made especially for me, the cruise line and all of the Great hints and tips I learn, that I can share with everyone, so I hope you will forgive me when I miss a week with a new recipe. Thank you for all of your support, and Happy Baking. Natalie
Ingredients:
Adapted from- Picky Palate
 -1 cup butter softened
-1 cup sugar
-1 cup brown sugar
-2 large eggs
-1 1/2 tsp pure vanilla extract
-1 /2 tsp salt
-1 tsp baking soda
-1 tsp baking powder
-2 cups Glutino frosted Corn Flakes(or GF Frosted Corn Flake of your choice)
-2 1/2 cups Pamela's Bread flour
-1 cup semi-sweet chocolate chips( I would do all chocolate next time)
-1cup vanilla chips( or white chocolate)
Directions:
-1 cup butter softened
-1 cup sugar
-1 cup brown sugar
-2 large eggs
-1 1/2 tsp pure vanilla extract
-1 /2 tsp salt
-1 tsp baking soda
-1 tsp baking powder
-2 cups Glutino frosted Corn Flakes(or GF Frosted Corn Flake of your choice)
-2 1/2 cups Pamela's Bread flour
-1 cup semi-sweet chocolate chips( I would do all chocolate next time)
-1cup vanilla chips( or white chocolate)
Directions:
 1- Preheat the oven to 375 degrees, spray the pan with baking spray. Bake for 10-12 min, the top will be lightly browned, but soft and chewy on the inside.
2-Beat the butter and sugar together until light and fluffy, next add the salt, soda and baking powder. Mix well and scrape sides.
3-Now add the eggs and combine well, then add the frosted flakes and mix them in ( they will break up nicely) then add the flour and mix well. Scrape the sides
4- Now add in the chocolate chips and mix in, then scrape the sides and form into balls and bake.
1- Preheat the oven to 375 degrees, spray the pan with baking spray. Bake for 10-12 min, the top will be lightly browned, but soft and chewy on the inside.
2-Beat the butter and sugar together until light and fluffy, next add the salt, soda and baking powder. Mix well and scrape sides.
3-Now add the eggs and combine well, then add the frosted flakes and mix them in ( they will break up nicely) then add the flour and mix well. Scrape the sides
4- Now add in the chocolate chips and mix in, then scrape the sides and form into balls and bake.

 A
Favorite thing!
There is something so good about the crunch of those frosted cornflakes! Irresistible!!
A
Favorite thing!
There is something so good about the crunch of those frosted cornflakes! Irresistible!!


 These are some Beautiful pictures of Southern Utah, in Kolob Canyon
.
If you are ever in Utah stop by and see our beautiful RED rocks, and fantastic warm weather!
My son's favorite of the day, there was a tractor grave yard, 200 in all...organized by color.
Pin It
Chocolate Chunk Brownies
Yes, I know, it's another chocolate recipe and another brownie; but a girl has needs, and this GIRL needs chocolate!! This has all the chocolatey goodness, any guy or girl could possibly ask for in a brownie or any dessert for that matter. My good friend said I should call them "orgasmic brownies" I told her I didn't think that would go over very well with everyone, but I did get a giant laugh about it!
I have to voice a concern I have, the other day I was on a Gluten Free Facebook group, and several people went on to BASH others for the way they cook, and what they cook and bake with. I personally bake with what I love, I'm a working wife and mother, who would still like a life outside of baking and cooking. I have also found that I don't have the time to make my own flour mix, nor do I want to, sometimes I use cake mixes, because we all have days when we have to throw together a quick dessert. I just try to make desserts that are delicious, and can be made by bakers all over the WORLD who are just like me. If you make your own flour mix, I am so happy you found what works for you, if your vegan or vegetarian please substitute what works for you. I try the very best I can, being Gluten Free is tough enough, I just wish people would not be unkind to others because we aren't doing it the way they, think is RIGHT. There is no right or wrong way to be Gluten Free, it's just the way that works best for you. Thank you for all of your support! Happy Baking, Natalie
Ingredients:
Adapted from Love to be in the kitchen
 -10 TB butter
-1 1/4 sugar
-3/4 cup plus 2TB unsweetened cocoa (I use half dark/half regular)
-1/4tsp salt
-1/2 tsp pure vanilla extract
-2 large eggs, cold
-1/2 cup Pamela's Bread Flour
-1 1/4 -1 1/2 cup chocolate chunks (I used 60% chocolate cocoa chunks)
Directions:
-10 TB butter
-1 1/4 sugar
-3/4 cup plus 2TB unsweetened cocoa (I use half dark/half regular)
-1/4tsp salt
-1/2 tsp pure vanilla extract
-2 large eggs, cold
-1/2 cup Pamela's Bread Flour
-1 1/4 -1 1/2 cup chocolate chunks (I used 60% chocolate cocoa chunks)
Directions:
 1-Preheat the oven to 325 degrees, Bake for 25-30 minutes (or until the center doesn't jiggle) use an 8x8 inch glass pan. Spray the bottom of the pan with cooking spray, then line the bottom with parchment paper and let it hang over 2 sides, it will help make the brownies easier to come out.
2-Cut the butter into chunks, combine the butter, sugar, cocoa and salt in a medium sized microwaved safe bowl. Microwave in 1 minute increments, stirring in between until the chocolate is melted and smooth. Set the mixture aside until it is warm, not hot.
1-Preheat the oven to 325 degrees, Bake for 25-30 minutes (or until the center doesn't jiggle) use an 8x8 inch glass pan. Spray the bottom of the pan with cooking spray, then line the bottom with parchment paper and let it hang over 2 sides, it will help make the brownies easier to come out.
2-Cut the butter into chunks, combine the butter, sugar, cocoa and salt in a medium sized microwaved safe bowl. Microwave in 1 minute increments, stirring in between until the chocolate is melted and smooth. Set the mixture aside until it is warm, not hot.
 3-Stir in the vanilla, with a wooden spoon then add the eggs one at a time and stir vigorously after each one, after this the batter should look nice and shiny, at this point fold the flour in carefully, just until there are no streaks of flour showing.
4-Next mix in the chocolate chunks, if the batter is too hot, it will melt the chunks, so wait a minute if you need to. Spread the batter into your prepared pan. Bake for 25-30 min, then make sure and let them cool for an hour at least to set. I let mine chill over night in the fridge, and they were fantastic!
5-If you want to make a really clean cut, throw it in the freezer for 30 minutes and then take the brownies out of the pan and cut them. Then enjoy!
3-Stir in the vanilla, with a wooden spoon then add the eggs one at a time and stir vigorously after each one, after this the batter should look nice and shiny, at this point fold the flour in carefully, just until there are no streaks of flour showing.
4-Next mix in the chocolate chunks, if the batter is too hot, it will melt the chunks, so wait a minute if you need to. Spread the batter into your prepared pan. Bake for 25-30 min, then make sure and let them cool for an hour at least to set. I let mine chill over night in the fridge, and they were fantastic!
5-If you want to make a really clean cut, throw it in the freezer for 30 minutes and then take the brownies out of the pan and cut them. Then enjoy!
 If you happen to not love chocolate as much as I do, make yourself a nice Brownie Sundae, that's what I did for my poor dad who almost died of chocolate overload!

 These are two of my favorite things, thankgoodness for Guittard Chocolate makers and making their chocolate Gluten Free!!
Pin It
My Favorite Banana Bread
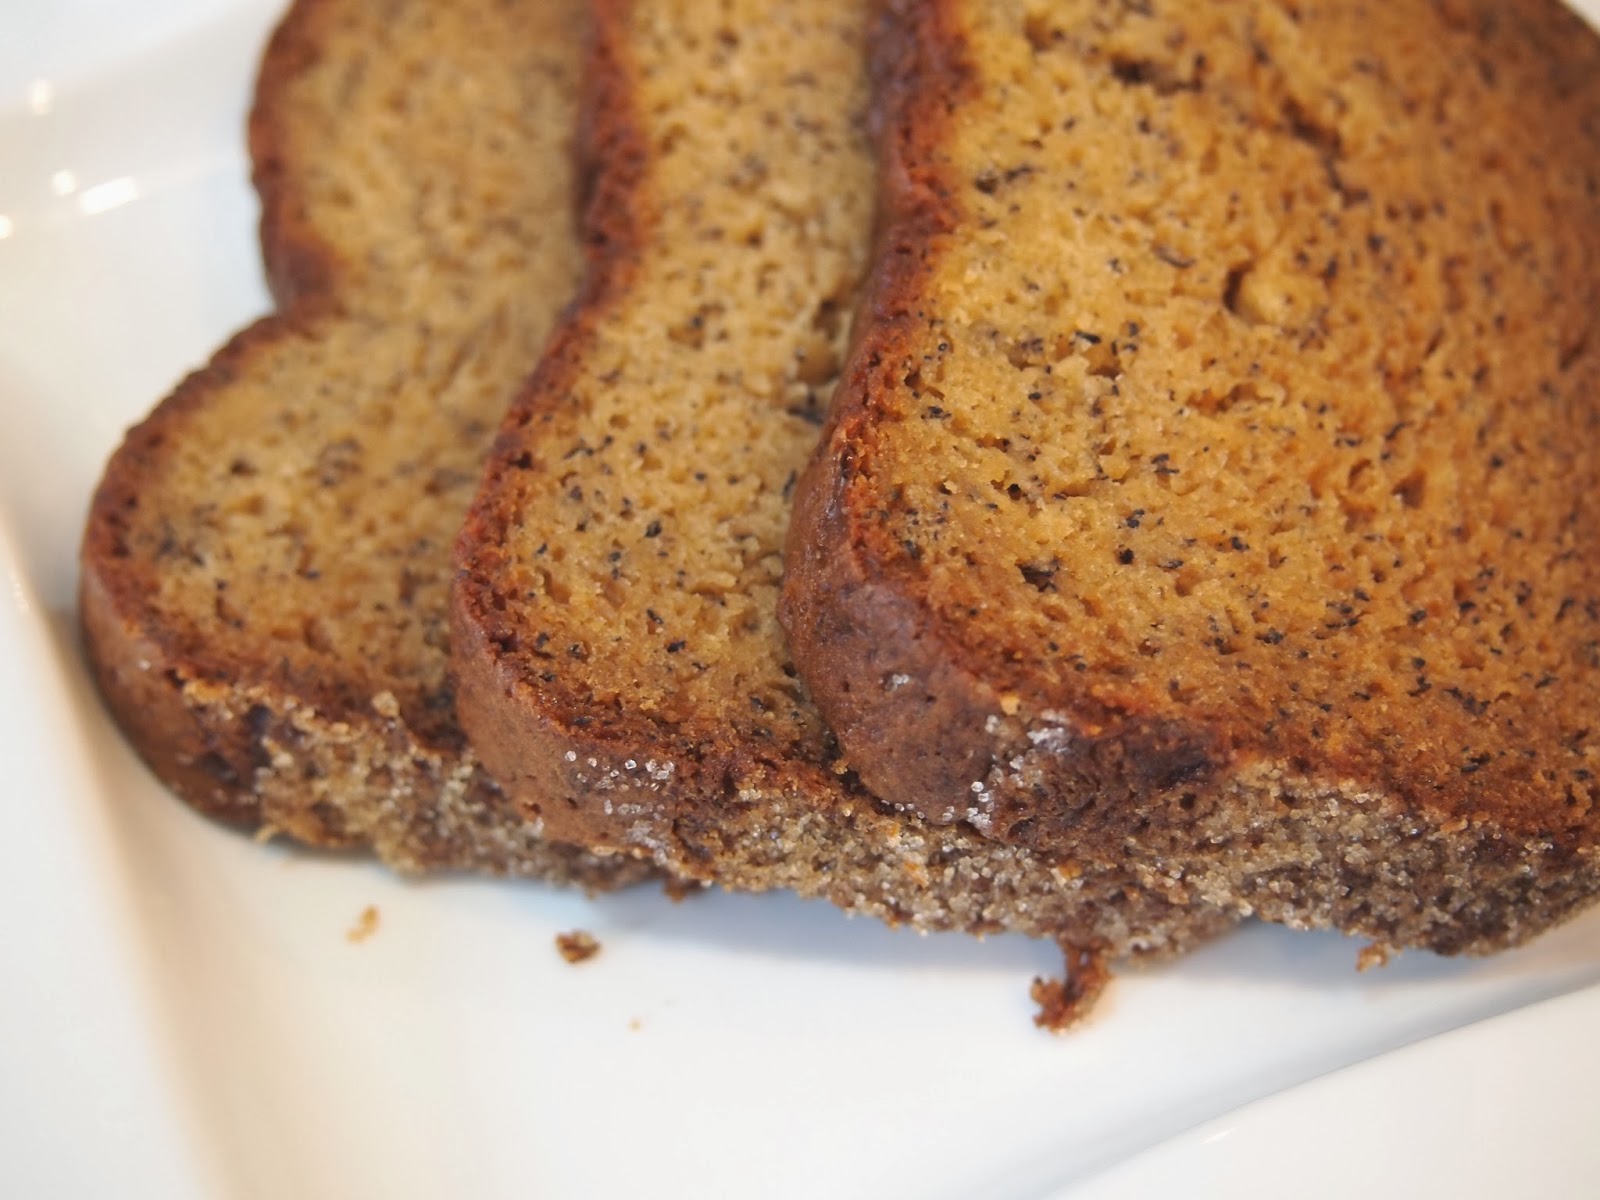
I made this bread originally a few weeks ago, there was only one problem, it didn't actually last long enough to have one single picture taken of it!! I had to take the picture of the loaf as soon as it came out, because the minute it cooled half was gone; so the 3 pieces you see, that was all I had left! ( I guess that means it's good)
This recipe is so quick and easy, it was FANTASTIC; also if you have any dairy issues, this recipe if for you. The best part about quick bread is, is they freeze, it's good for breakfast, a snack, dessert, warm, cold it doesn't matter it's just great to have. I hope you enjoy this bread a much as I do, and my family and friends! Happy Baking, Natalie
Ingredients:
This was adapted from Better Homes and Gardens
-1 3/4 cups Pamela's Bread Flour
-2/3 cup sugar
-2 tsp baking powder
-1 1/2 tsp baking soda
-1/4 tsp salt
-1 cup mashed banana (2to 3 med bananas)
-1/3 cup butter, or oil
-2 TB Buttermilk
-1 tsp pure vanilla extract
-2 large eggs
-1/4 cup chopped nuts or chocolate chips(I used none of the above)
Putting it together:
This makes 1 loaf*
1-In a large bowl or mixer add the flour, sugar, baking soda, baking powder and salt mix them together.
2-Add banana, butter or oil and buttermilk, beat them in the mixer until blended for about 2 minutes.
3-Next add eggs and vanilla mix until combined well, about 2 minutes, scraping the sides, add nuts or chocolate chips now if you would like.
4-Pour the batter into the pan now and smooth the top.
 Preheat the oven to 350 degrees, use a 8x4x2 inch loaf pan. Make sure and spray your pan with cooking spray, I like so sprinkle my pan with a little sugar, instead of flour, to help it come out of the pan easier. (my husband loves it this way) Bake it for 60 minutes or until a toothpick comes out clean. Cool on a wire rack for 10-15 minutes in the pan, then take it out of the pan and cool some more.

 I have no idea why there is a color change in the bread, it is not burned, it doesn't taste burned in the least. It's just weird, dark to light from the bottom to the top, both times I made it.
This is my section called Favorite Things:
I have no idea why there is a color change in the bread, it is not burned, it doesn't taste burned in the least. It's just weird, dark to light from the bottom to the top, both times I made it.
This is my section called Favorite Things:
 One of my very Favorite things is Buttermilk, I don't care what kind you get I think it makes everything Gluten Free so much BETTER! I have baked without out it, and the texture is never as good or as light. If you don't or haven't baked with it, you definitely need to try it!

 -1 cup butter softened
  1- Preheat the oven to 375 degrees, spray the pan with baking spray. Bake for 10-12 min, the top will be lightly browned, but soft and chewy on the inside.