Wednesday, November 21, 2012

Gluten Free Homemade Twix Bars

Pin It

                     Homemade Twix Bars


Oh my gosh who doesn't love a Twix Bar?  Well, I can honestly say, that every  Halloween I would buy the giant bags of candy from Costco with the Twix in the bag, and single handily eat all of the Twix(these were the bite size)!  However within a two week period those babies would VANISH, and I never felt bad!!!  Sadly, this year there would be no more Twix, until I found on Pinterest others loved them too.  Soooo, I decided it was time to make some homemade Twix and enjoy them once again!  Oh baby, they were SO STINKING GOOD, I missed them!!  They were so good I couldn't keep my kids, and husband away from them either.  The best part is, these are easy to make, and freeze like a dream!  I hope you enjoy them as much as I did, Natalie


Crust-

Ingredients:

-2 cubes softened butter(1 cup or 8oz)

-1/2 cup sugar

-2 cups Pamela's Bread

-2 tsp baking powder

  Beat the butter and sugar until they are creamed, then add the baking powder and flour, mix just until combined.  Take the batter and pat it down into the prepared pan, when it is cooked it will have a  golden color.  Cool completely.


Preheat oven to 350 degrees, spray the bottom of a 9x13 pan,and then line it with parchment paper and have it go up over the sides for easy removal of the shortbread crust.  Bake for 23-26min until it is golden brown, you want it a little crispy.


  Caramel Layer-

-60 Kraft Caramels(unwrapped)my husband likes a lot of caramel

-6 TBS Heavy cream

Put all of the caramels into a medium pot and turn it on medium low heat, stir as they melt and add in the cream.  Continue stirring until it is all smooth and creamy, about 15-20 min then pour it on to the short bread crust  and smooth out.  Let them cool for 30-45 min in the fridge.


Chocolate Layer-

-1 bag (12 oz) semi-sweet  Gluten Free chocolate chips

-1 tsp Crisco 

Use a microwave safe bowl , pour the chocolate chips into the bowl and heat in 30 second intervals, make sure and stir in between each time.  The Crisco is to help thin the chocolate and make it more spreadable, nasty sounding but necessary!  When it is all smooth pour onto the CARAMEL, and smooth it and make it as even as possible.  When this is done put into the fridge or freezer to chill and set. 


Make sure and cute with a serrated knife, also let them warm up a bit or they will all crack like my bars below!  Not really pretty, but they taste good all the same.


Monday, November 5, 2012

Gluten Free Peachy Cake Balls

Pin It

               Peachy Cake Balls


      Peaches, what can I say about them; I think Peaches are one of the GREATEST fruits ever, so anytime I can put a Peach in a dessert I will, and cake balls and peaches together, there is NOTHING better!!!  Every time I go to a wedding, baby shower, or wedding shower they always have Fantastic looking desserts that I NEVER get to eat!!  I smile and nod and have a piece of fruit, and a vegetable with no dip, for fear it will make me sick, then when I go home I feel more bitter every time, and make a big batch of something I can eat, because I am so jealous of all the pretty desserts.  So enough whining, I make cake balls so when I need a pretty dessert, or my Gluten Free Friends need one, we can just pull a couple out of the freezer, and have OUR very own tasty and pretty treat, that others are jealous of!  So, if you need a pretty treat, make cake balls and eat them in front of your Gluten eating family, they will be jealous! Natalie


Ingredients:

-1 box Betty Crocker GF yellow cake mix

-3 large eggs

-3/4 cup buttermilk

-1 stick of butter melted(not bubbling)

- 2 tsp pure vanilla extract

       Mix all of these ingredients together in a mixer or large bowl with a hand mixer, for 2 min.  Pour it into a 9x13 inch pan.

     Bake at 350 degrees for  25-27 min, don't overcook or it will be dry.  Use a 9x13 inch glass pan and spray it with Pam.   Once it is cooked, let it cool completely then crumble it up and set aside.  You can even put the crumbles in a Ziploc and freeze or wait until the next day.


      Add: 

- 1 brick of cream cheese, that has come up to room temperature

- 1/4- 1/3 cup powdered sugar (depending on how sweet you like it)

-1 cup fresh peaches (you can also use frozen) if you want less peaches you less, I love them, chop them into small chunks.


       Mix all of these ingredients together with a wooden spoon,or like I do, with fresh clean hands.  When it is all combined then roll them into nice even balls, and put them on a pan that has been sprayed with Pam, and then throw them in the Freezer and leave for 2 hours or over night.


      Finish: sometimes I am lazy and when the balls are frozen, and I don't have time to finish them that day, I just take them off the pan and put them in  a freezer bag for another day.  Don't buy candy coating, it cracks and it's the pitts!!! I always buy the big bricks of Chocolate white or dark, it melts so much better, and stays on the cake balls or anything.  So get your chocolate, put it in a microwave safe bowl and heat it up a minute at a time, and stir.  If it is too thick, add some Crisco, sounds nasty but makes it so much easier to dip!  I put tooth picks in the top of the frozen balls and then use that too dip it in the chocolate,  then when it hardens it pulls right out.  Once you do this it is so easy, if you want pops add sticks when you are rolling them.


 Cake Balls are Fantastic, and they store really well; that is if you can keep them around that  long.  My longest batch has lasted 2 months in the freezer and been great, tasting like they were made that day!  Let me know what you think.


Sunday, November 4, 2012

Gluten Free Cinnamon Swirl Suprise Cake

Pin It

       Cinnamon Swirl Surprise Cake


     I had some pumpkin left over from Halloween, so I just couldn't let it go to waste.  I made a Pumpkin  Sheet Cake, and decked it out with black cream cheese frosting; funny thing about that, half of my family wouldn't eat because of the color.  Lesson learned,  just use boring food colors for coloring frosting from now on.   So, with pumpkin being so expensive I couldn't throw the rest of the can away.  However, since I have a Pinterest problem, I got onto my boards looking for   a recipe that looked good; I found 6, I let my family decide which recipe I would make today, this is the one my husband liked the best, by looks alone.  After I made it, my husband and kids all really LOVED it, and said it would make a perfect THANKSGIVING dessert!!  So give it a try, I hope you love it too

These are just a few of my family, Ghost and Ghouls


This recipe was adapted from the Picky Palate

 Ingredients:

-1 box Gluten Free Betty Crocker, yellow cake mix (15oz)

-3 large eggs

-1/2 cup vegetable oil

-1/2 cup buttermilk 

-1 oz vanilla instant pudding, ( I used sugar free,fat free)

-1/2 cup sour cream

-1 1/2 cups pumpkin puree


Bake at 350 degrees 33-35 min, in a 14x18 in large cookie sheet.  Spray it with Pam.  Cool for 15 min before you drizzle the glaze.


1-   Combine-the cake mix, eggs, vegetable oil, buttermilk, pudding, sour cream and pumpkin puree in a mixer or large bowl.  Let them mix for about 2 minutes.   Then pour onto the pan, make sure and spread evenly.

2- Next-melt the butter, then add the brown sugar and cinnamon and stir them together, until they are combined.  Then drizzle it over the batter, and use a knife and swirl it around (I may have gotten a little excited and over swirled, but it sure looked pretty)


  Cinnamon Swirl:

 -1/3 cup (6 TBS) butter melted

- 1/2 cup brown sugar, packed

-1/2 tsp cinnamon 

  Glaze:  

-3/4 powdered sugar

-1/4- 1/2 cup heavy cream( depending on how thick you want it)  

3- With the glaze, use a mixer and mix the powdered sugar and the cream together, until they are mixed nice and smooth.  Then drizzle it over your cake when it is cooled a bit.


I think this is a really light dessert, and would be great after Thanksgiving, and it was SO easy to make!


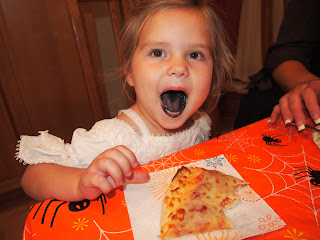
This is my niece, black teeth and tongue from the black frosting.

This one of my Favorite Witches, Sophie!